Floating content is web content that appears on a page in its separate box that is going out or sliding in. The floating behavior may happen on a page’s load or when a user scrolls down. It is usually a small box or banner that appears in the corner of the page and remains in a viewport until visitors close it if such an option is given. These types of boxes can be used to promote products, services, or other content that the user may be interested in, and in this article, we’ll see how to add floating WordPress content in different ways. Covering:
- How: add floating WordPress content without a plugin – You’ll see how to do it in the old way prior WordPress block editor and a new way of doing it by utilizing the block editor
- How: use a WordPress plugin to add floating content – Common steps to apply when using a plugin to add floating content
Benefits of Adding Floating Content to a WordPress Site
Adding floating content to a WordPress site can be beneficial in many ways. It can help increase user engagement and keep visitors on the page longer. It can also be used to promote products and services or to provide useful information to visitors. Floating content can also be used to capture user information and build an email list. Let’s not forget, it can be used to point visitors and drive traffic to other pages on the site.
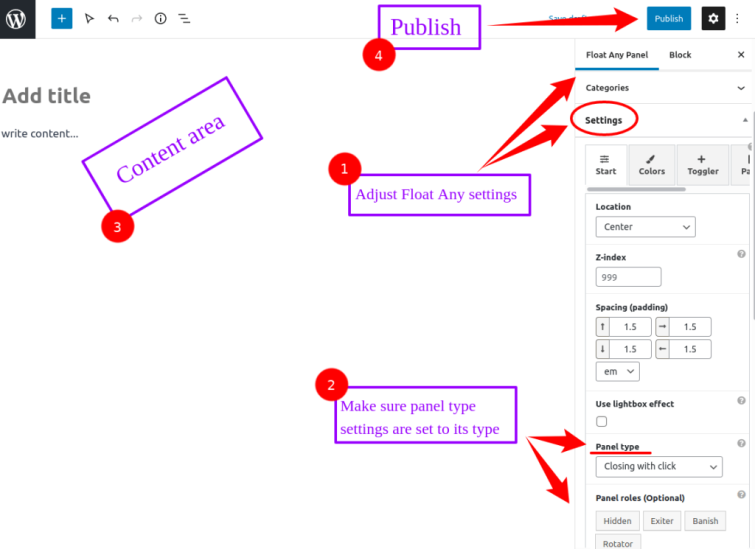
The simplest way to add floating content with WordPress is by utilizing one of its plugins that provide such functionality. This illustration is an example from the MaxBoxy plugin and how you can utilize the WordPress interface to set floating content.
Whether you’re a web developer looking for the perfect plugin or an online business wanting to simplify content management, MaxBoxy has the solution for you. Our plugin is the perfect tool for adding attention-grabbing content, it makes it easy to create your website stand out by displaying content in a unique and visually appealing way.
While using the specialized plugin is the simplest way to add floating content, there are certainly other options. Further, we’ll explore different ways describing how to add floating content to WordPress sites.
How To Add Floating WordPress Content Without A Plugin
Use WordPress’ custom HTML block to add adequate code
To add floating content to a WordPress website without a plugin, users can use the additional CSS editor to add CSS code. These tools are provided inside WordPress itself nowadays. Further, you may also use an additional plugin which may provide more flexibility. Here we do not think of specialized floating content plugins, instead, there are plugins that allow you to add CSS, JS, or other code to WordPress-based Websites. So, let’s see what options are actually at our disposal:
- Custom HTML block – with the new era of WordPress, everything in its editor is revealed as a block. That way, there’s a Custom HTML block that you can use to add custom HTML elements, as well as to add additional CSS or JS code. This way, the code will be placed inline. If you are in page editing mode, the CSS code you place here will be presented only for that particular page. On the other side, if you’ve plunged into the development options and are editing a template, that CSS code will be presented everywhere that the template is applied
- Customizer’s editor – if your site is with the classic theme, i.e. old-school theme, from the Dashboard, going to Appearance -> Customize -> Additional CSS, will give you the option to add custom CSS code. The code placed here will be globally applied for the whole site. This way, the code will be added to each page’s head
- Plugin for adding code – on the market, there’re quite a few plugins that allow you to do this. Check the free version of MaxBoxy. Unlike with the aforementioned Customizer, here you’ll have the possibility to add the JS code as well besides the CSS. Further, with Pro version have more flexibility and the option to limit the floating element to only some pages, to add the code for bulk pages and other custom post types
Now you’ll have to add the code which will provide floating functionality. It’s better to leave this job to a developer, but if you really want to proceed on your own, to add some very simple floating WordPress content to your Website you can use the following approach.
The old way of making WordPress content float without the plugin
Many Websites are built prior to the WordPress block functionality and are still utilizing the old classic editor. In that case, most likely, you’ll have to utilize the child theme and along with adding CSS to it, you’ll have to edit a functions.php file and add some PHP code. Instead of writing in detail about this, here’s a link I found that describes how to add a floating element by editing your child theme’s code and another one on how to add a floating button icon.
The new way to add CSS into WordPress and make it floating
Since WordPress has turned its editor to block-based functionality, we can utilize its native custom HTML block to add custom code and that way make a content float.
- Add a class to the element you want to style, e.g.
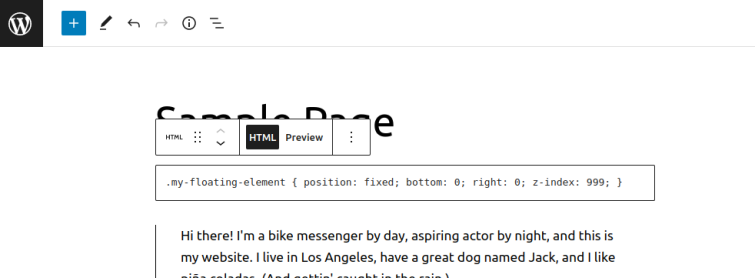
my-floating-element. For example, you can use a Group block and style it from the WordPress interface, i.e. add background color and add additional elements like image and the textual message - add the code to the custom HTML block wrapped by the
<style>and</style>tags:
.my-floating-element { position: fixed; bottom: 0; right: 0; z-index: 999; }Well, that’s it! That’s gonna position an element, as a floating, to the right corner of the page. You can additionally apply margin or width, e.g:
.my-floating-element { margin:20px; width: 50%; }It’s that simple. That explains how to add floating WordPress content to your site in the simplest way. This solution is suitable if you do not need complex functionality and conditions. It is also utilizing a new native block editing, which is a functionality introduced a couple of years ago. Before this, it wasn’t that easy to add classes to elements on the WordPress’ page.
How To Add Floating Content In WordPress With A Plugin

Let’s see how WordPress plugins can be of help in creating floating content. We split the process into three steps.
Step One: Install a Plugin
The first step in creating floating WordPress content is to install a plugin. There are many plugins available that allow you to easily create and manage floating content. Be sure to choose a plugin that is compatible with your version of WordPress and that offers the features you need.
Step Two: Adjusting the Plugin Settings
Once you have installed the plugin, you will need to adjust the settings to customize the look and behavior of the floating content. This will typically include options for positioning, styling, and triggering the content. These plugins usually include features such as the ability to customize the look and feel of the content, as well as the ability to determine the way the floating boxes are appearing on a page.
Step Three: Adding the Floating Content
Once the plugin is set up, you can begin adding the actual content. This could include text, images, videos, or other types of media. This can be done by using the plugin’s settings page, which usually includes options for adding text, images, and links. It is important to ensure that the text and images are relevant to the content of the page and that they are properly sized for the space available. Depending on the plugin you are using, you may also be able to add custom HTML or CSS code.
Customizing the Floating Content
The third step is to customize the floating content. This can include changing the size, color, and position of the content, as well as adding animation or other effects. Most plugins will also allow users to add custom CSS to further customize the appearance of the content.
Adding Floating Content to Different Pages
You’ll find this option with premium plugins. Once the content has been customized, the next step is to set for which pages on the site you wish to render the floating boxes. This can be done by using the plugin’s settings page if it includes options for adding content to specific pages or posts.
Tips For Optimizing Floating Content
Here we want to underline what you should be paying attention to while setting the floating content on your WordPress site.
- Testing and troubleshooting -The final step to publishing the floating content is to make sure it is working properly. This can be done by viewing the page in a browser and making sure that the content appears as expected. If there are any issues, now is the time to correct them.
- Check the speed impact – you may want to check if the added content is producing a significant performance impact. There are also a number of tools available that can be used to test the optimization of the Website’s content. Some of the most popular tools include Google’s PageSpeed Insights, GTmetrix, and WebPageTest.
- Support and documentation availability – when you’re using a plugin to add floating content to a WordPress site, users can consult the documentation for the plugin they are using. Additionally, users can search online for more detailed information or contact the plugin’s support team for assistance.
Recommended WordPress Floating Content Plugins
There are a number of plugins available that allow users to easily add floating content to their WordPress site. Depending on your needs you may pick a proper solution for the Website you’re building. Let’s name a few:
- MaxBoxy – obviously, provides the perfect solution for WordPress users who need to float content on their Website. Our plugin makes creating attractive content boxes and visually appealing call-to-action buttons and coupons easy with minimal effort. Our content floating tools are designed to be user-friendly, so even those with limited coding experience can get up and running quickly. Try MaxBoxy today and start making your WordPress site look amazing!
- If you’re using Page builders for WordPress, such as Brizy, most of them will provide you with popup and floating content builders – check the Brizy popup builder or another option to add floating video with Architect page builder. The advantage of using page builder is that it provides you with the most of tools you will need to build a site. However, this may be seen as a disadvantage too, because there’s a long learning curve and it certainly is a robust solution that may bloat your pages with unnecessary code.
That’s it. Now you have more options to choose from on how to add floating WordPress content, including without a plugin and using a plugin. By utilizing floating content on the site you’ll certainly find benefits like user engagement and longer Website visits.
More to read…
Optimized Responsive Floating Content – Make Elements Shine On Mobile Devices
Today, with so much web traffic coming from mobile devices, optimizing content for these platforms is a must, not just an option. Making responsive floating content, like pop-ups and sticky menus that stay around while you scroll, can boost user interaction if done right. If not customized for the constraints and potential of mobile screens,…
Creative Ways to Use Floating Content to Boost Conversions
Boost your marketing strategy with floating content solutions. These elements catch the eye, helping your message pop in a busy online space. They guide folks through your site, pushing them gently toward actions like signing up or making a purchase. Place these attention-grabbers at crucial spots on your website or app. You’ll see better engagement…
Best WordPress Floating Content Hacks
By strategically implementing these elements within a WordPress site using appropriate plugins and designs, businesses can effectively boost user engagement while enhancing both usability and conversion potential. Leveraging WordPress floating content presents an effective strategy for improving user engagement and providing persistent access to critical information while enhancing interactivity and overall browsing experience on your…
Improve Your Site with a Custom Floating Sidebar for WordPress
WordPress is one of the most versatile content management systems available today, but it comes with its own set of challenges. One such challenge is the default sidebar functionality especially if there’s a need for a unique site navigation. Often people need a custom floating sidebar for WordPress. Default sidebars are static, often cluttered with…
Increase WordPress Engagement Rates and Improve Bounce Rates
The problem many website owners are facing is the struggle with low engagement and high bounce rates on the site. Today we’ll explore how to increase WordPress engagement rates and improve bounce rates. In the digital world, your website often gives potential customers the first impression of your business. Yet, despite investing in compelling content…
WordPress Popup Maker Made Simple: Boost Conversions
Discuss the importance of popups in a website’s conversion rate Best Practices for Using Popups Online businesses require a strategic approach to engage their audience beyond an attractive website or pure content. One aspect to consider when creating and implementing a digital marketing plan involves the usage of popups. While popups can be somewhat intrusive…