
Quick start
- Installation
- Installation (PRO)
- License (PRO)
- Settings
- Settings (PRO)
- Front Page
- Blog Page
- Logo
Site editor
Page editing
Styling
This page explains how to install and use the IceCubo WordPress theme.
Installation
The easiest approach is to do it from your WordPress admin. Just go to the “Appearance” section → and locate the “Add New Theme” button. Now, use the search box to type “IceCubo”. You should be presented with the result of the IceCubo theme.
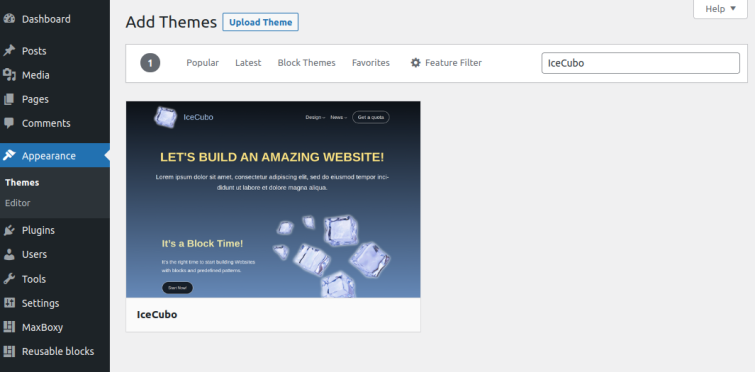
Hovering over the image will provide a button option to install the theme and eventually activate it.
An alternative approach to installing a theme is to use an FTP client. Obviously, this is for the advanced users. From the wordpress.org repository, download the IceCubo theme, then using an FTP client, add it to the themes section of the WordPress installation, i.e. “wp-content” → “themes”.
Activate IceCubo theme
Now that the theme is installed, it will always be available in the “Appearance” section of the WordPress admin area.
If you missed activating the theme during the UI installation prompt, navigate to the “Appearance” section and therefrom activate the IceCubo theme.
Installation (PRO)
You’ll still use the IceCubo theme. Further, you’ll be able to activate the IceCubo Pro plugin.
After the purchase, download the IceCubo Pro plugin, then inside your WordPress admin, go to the Plugins → Add Plugin. Choose the option “Upload Plugin”. Browse to the folder where the downloaded IceCubo Pro plugin sits on your computer, and pick it up for upload.
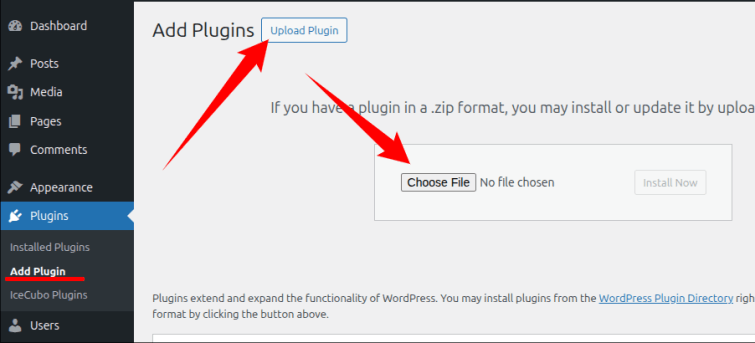
Activate the PRO plugin
While uploading the plugin, you’ll be prompted for its activation. If you miss that, you can always manage plugins from the “Plugins” section inside the WordPress admin side.
Activate the License
With the order confirmation email you’ll get the license code. From the site’s admin dashboard navigate to the Appearance → IceCubo License. Enter the license code to activate the Pro plugin.
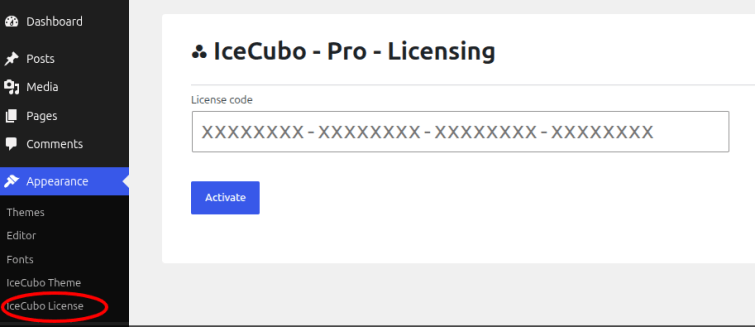
Settings
Inside your WordPress admin, you’ll be able to adjust the settings from the Settings tab (Appearance → IceCubo Theme → Settings).
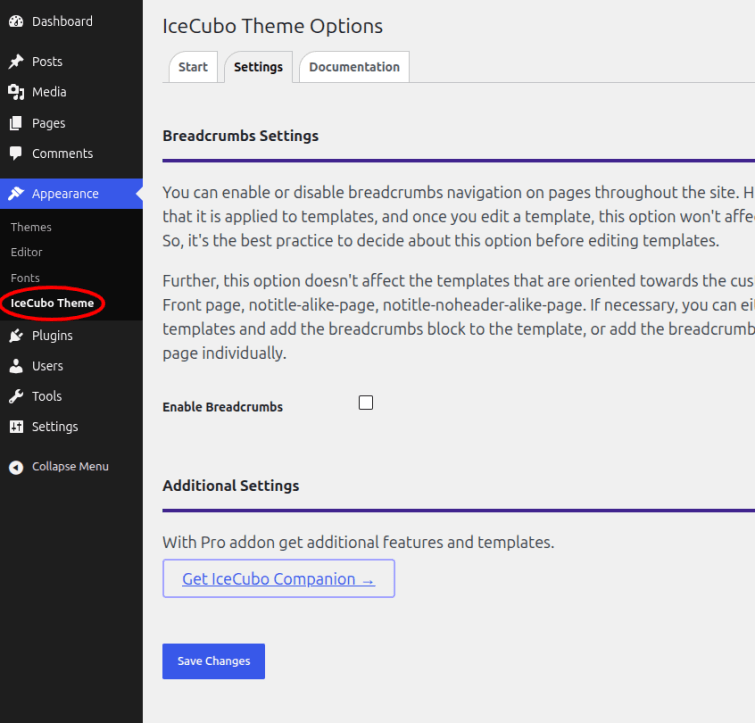
Breadcrumbs settings – You can enable or disable breadcrumbs navigation on pages throughout the site. However, note that it is applied to templates, and once you edit a template, this option won’t affect that template anymore. So, it’s the best practice to decide about this option before editing templates.
Further, breadcrumbs option doesn’t affect the templates that are oriented towards the custom design, i.e. Front page, notitle-alike-page, notitle-noheader-alike-page. If necessary, you can either edit these templates and add the breadcrumbs block to the template, or add the breadcrumbs block to each page individually.
Settings (Pro)
With the Pro plugin and its license activated there will be more options from the Settings tab (Appearance → IceCubo Theme → Settings).
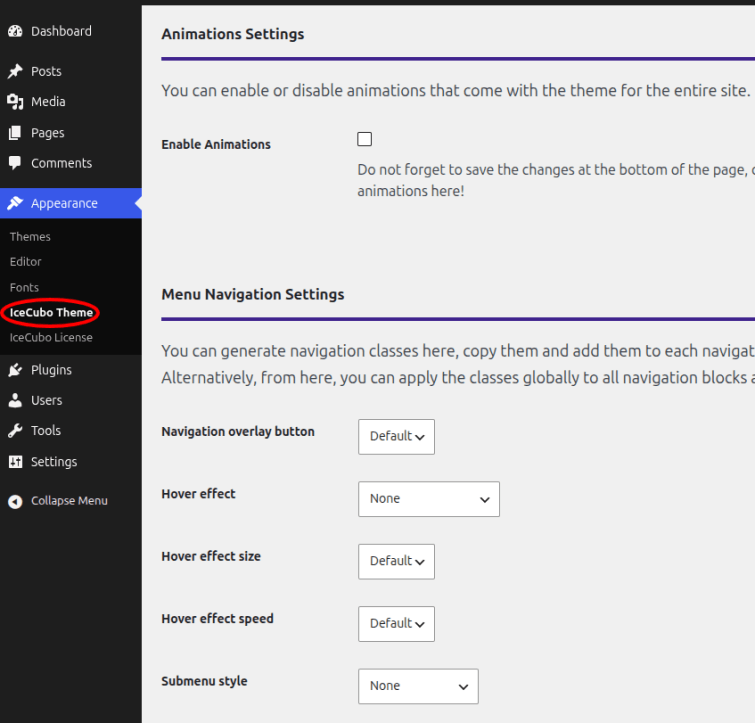
1. Animations – Here you can enable and generate animations. Then add generated animation to any WordPress block as additional classes
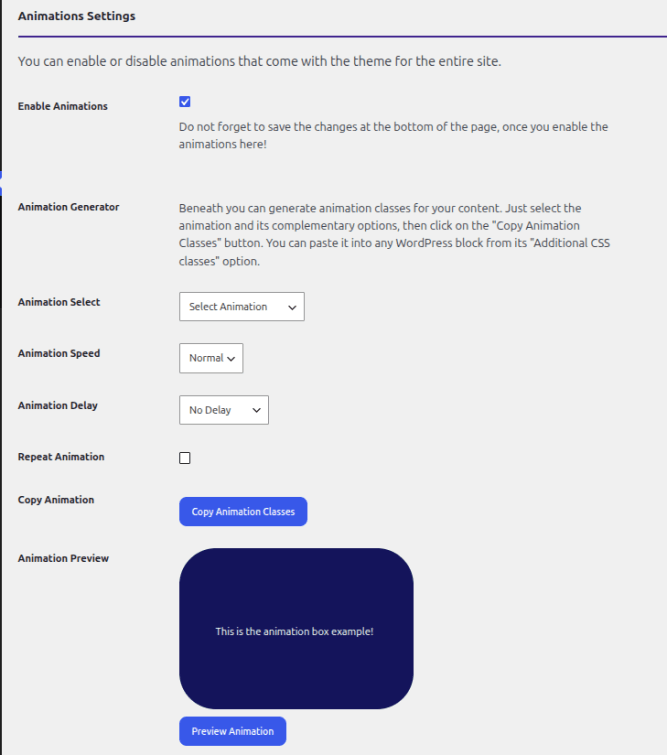
2. Navigation – You can also generate classes for the navigation blocks. Style your menus as a general foundation or each individually. Add generated classes to any navigation block from the block options → additional classes
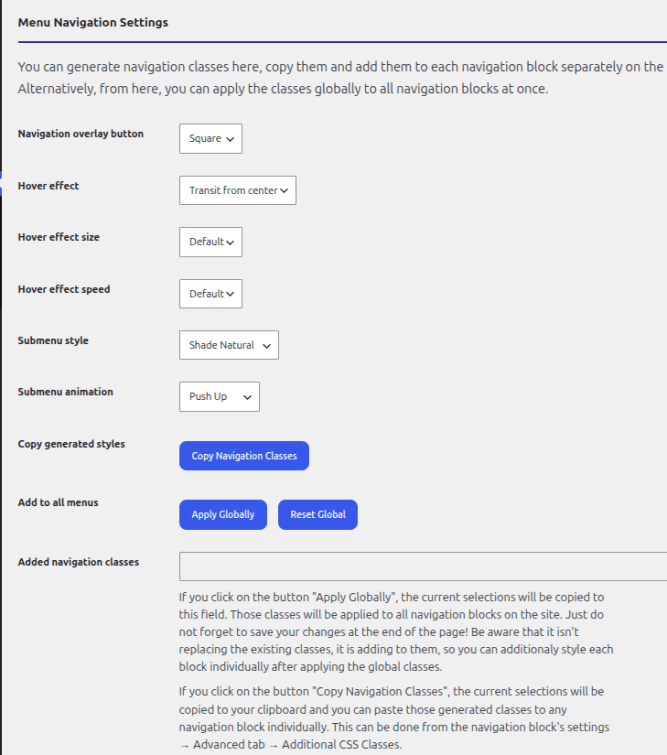
3. Design templates – Further, enable particular design templates. Of course, you can enable all templates. This option is available in order to de-clutter the space inside the Editor, if you wish so, so that you do not scroll through the patterns you do not have in mind for the current project.
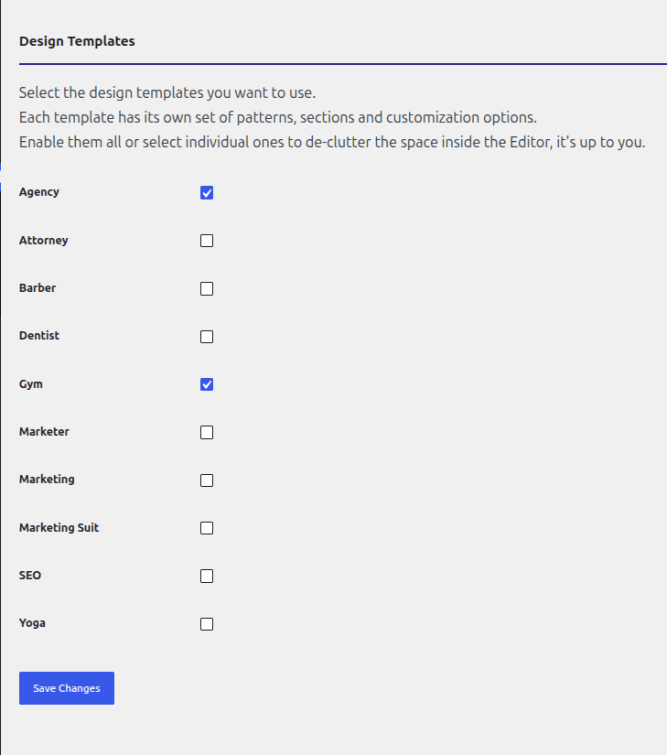
Once enabled the patterns and full page templates become available from the Block and Patterns Inserter inside the Page or Site Editor, while the full page templates can be inserted from the Design tab in the Editor as well.
Front Page Setup and Editing
After installation, you should go to the Site Editor to adjust the site’s Front Page. This can be accessed in two ways:
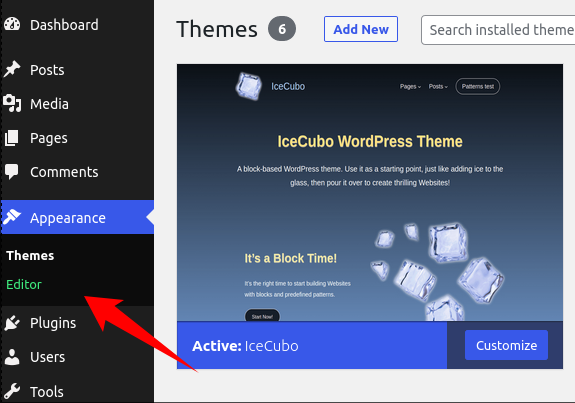
1. From the Admin Dashboard, visit Appearance → Editor
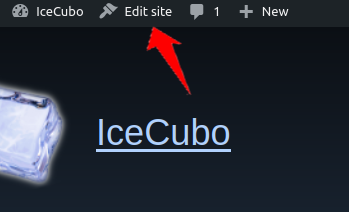
2. Or from the front side of the site, by visiting the Home page or Front page. Then, from the admin toolbar, click on the “Edit site” link.
This will lead you inside the Site Editor, and you’ll be able to edit the Front Page template.
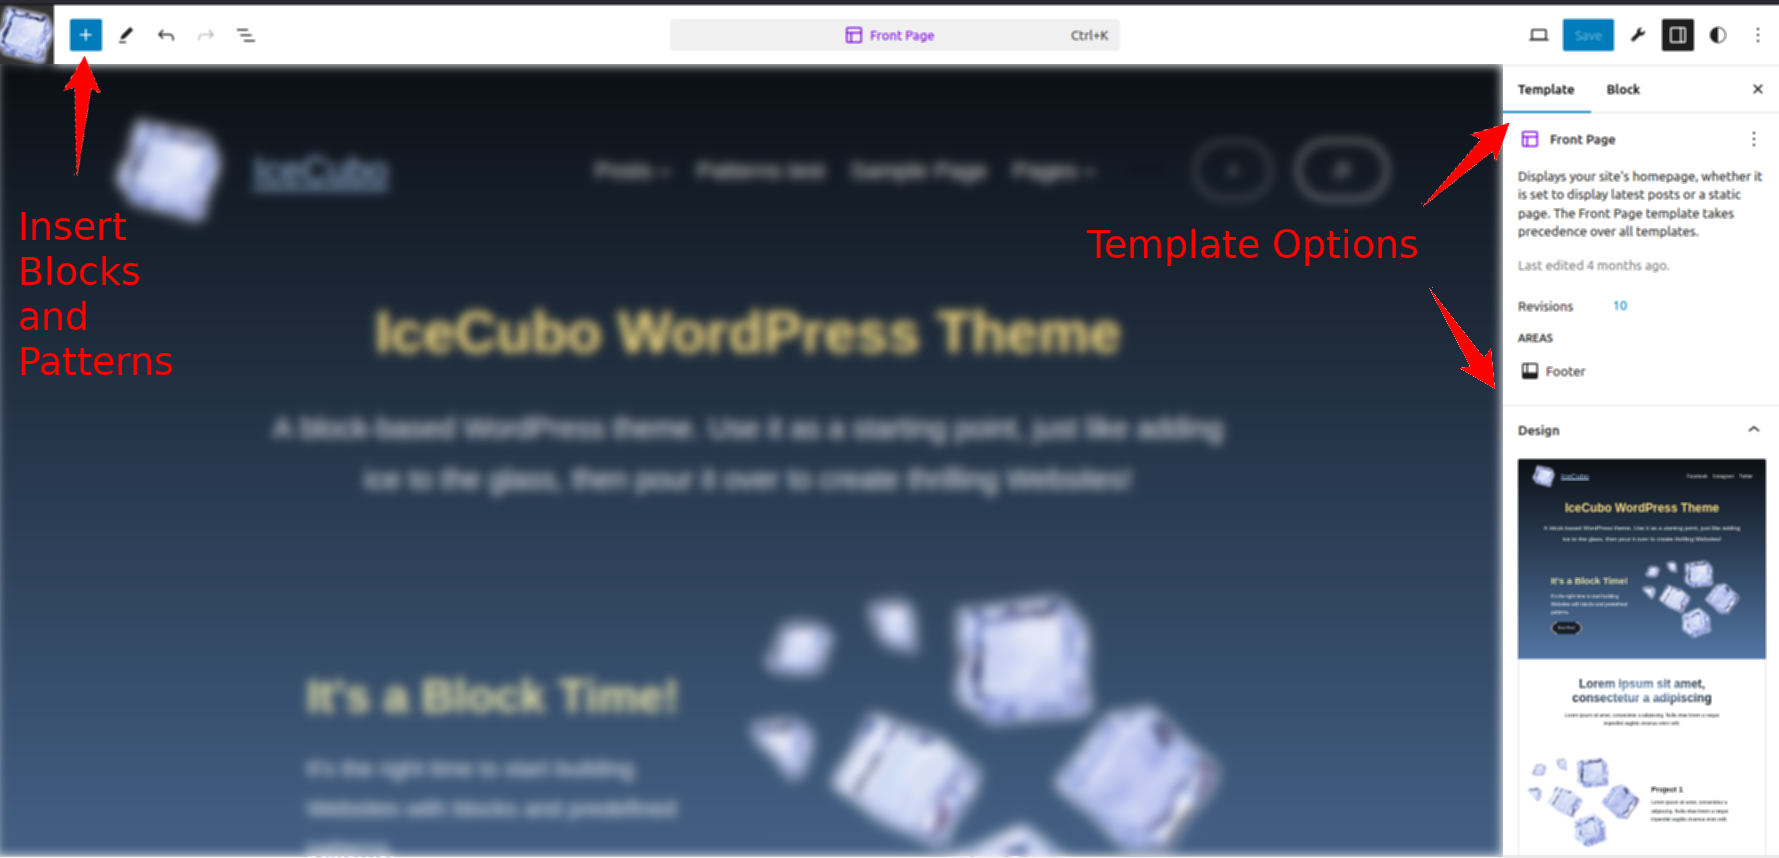
2. Replace the Whole Staring Template with another one from the Settings (Right Sidebar) → Template → Design
- Here you can start editing the template’s placeholder text and images
- Another option is to replace the entire template content with an alternative design (from the Settings in the right sidebar, notice the Template tab → Design)
- If you’re not entirely satisfied with a predefined design, you can add additional blocks (Inserter button + from the toolbar’s left side)
- Further, you can replace the sections of the page, e.g. by selecting another Header pattern
Blog page settings
To adjust the Blog page, there are two options, depending on the Reading settings (Admin’s Dashboard → Settings → Reading):
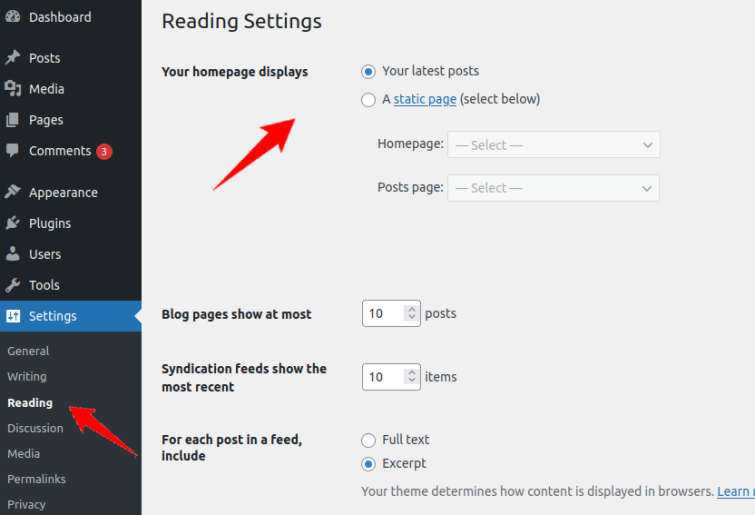
If you keep the WordPress default Reading settings, (Your homepage displays: Your latest posts) the homepage will still be showing the Front page template. This is because the IceCubo theme comes with the Front-page template and this option would display the Index template (Blog posts) only with themes that do not include the Front-page template.
In order to display the Blog posts with this option, you would need to edit the Front-page template and actually replace its content with posts query and related blocks that would represent the Blog page.
You can still keep this option selected if you intend to use the Front-page template.
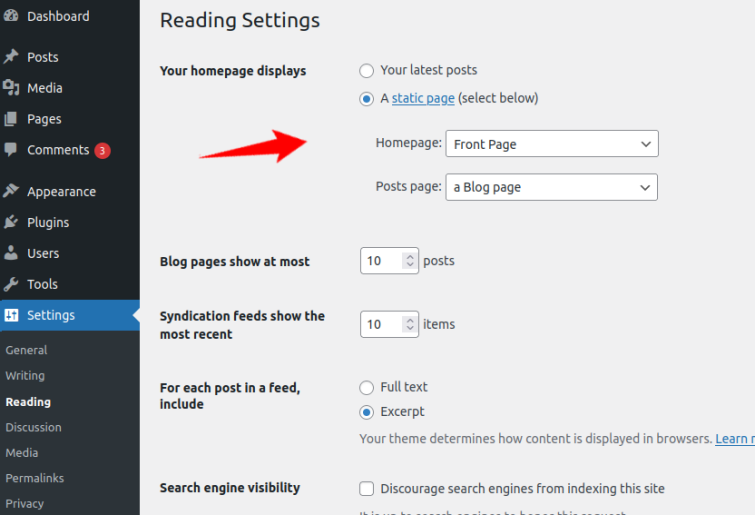
If you are changing the Reading settings and therefrom you select the Static page for your homepage display option, then the Front-page template that comes with the theme will still act as the homepage, while the selected page will redirect to the homepage. The selected page for the Posts page will automatically inherit the Index page layout and design. The Index template can also be edited from the site Editor → Templates, just like the Front-page template.
This is how WordPress works, things can be done in different ways. Hopefully, Reading settings (e.g. Front Page/Home/Blog options) will be simplified in the future.
Insert posts (query loop block)
This is how you can insert Blog posts:
1. With a query block
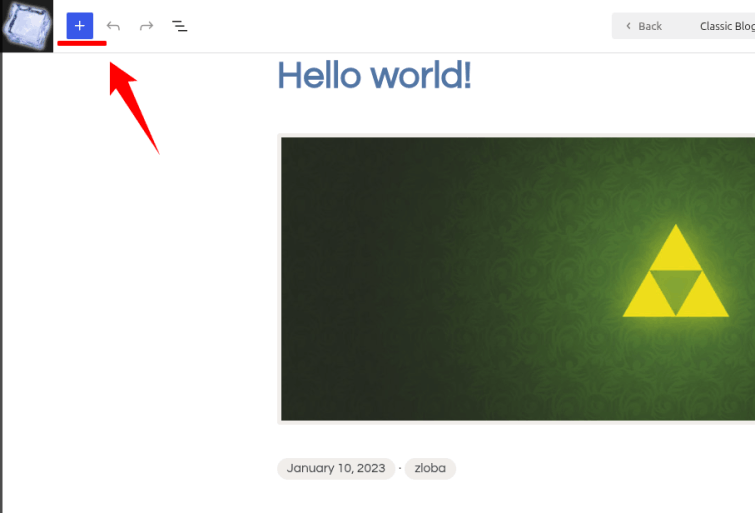
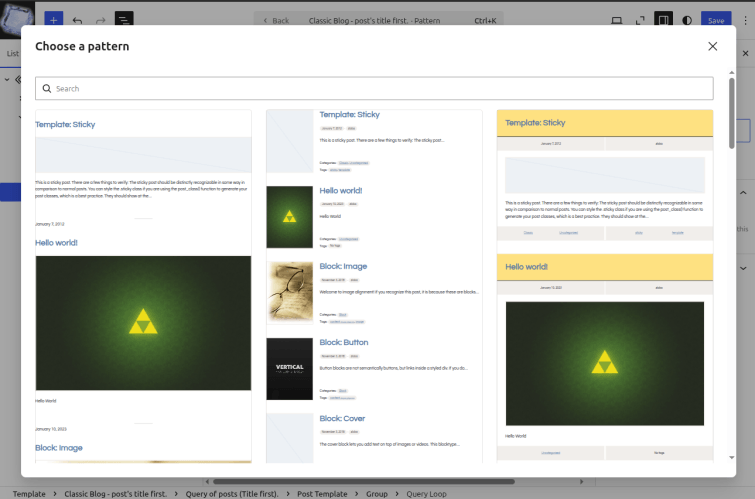
Click on the Inserter button and search for the “query loop”. You’ll be able to choose a pattern from the available WordPress default and IceCubo’s provided patterns.
2. Directly insert a pattern.
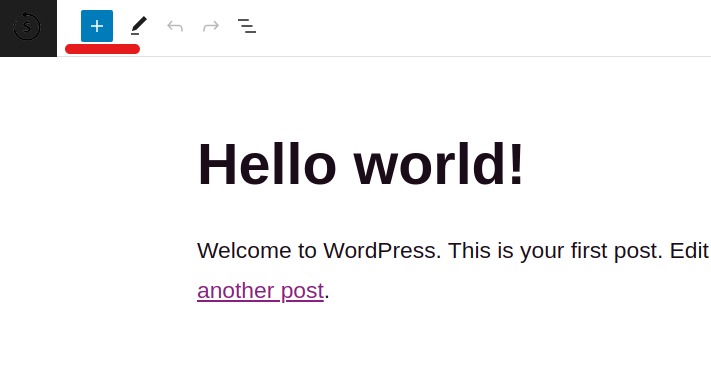
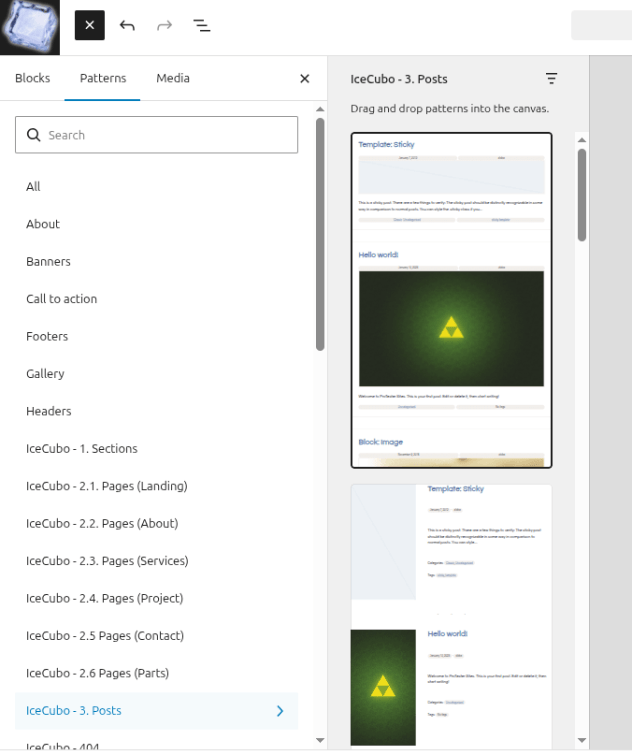
From the Inserter button pick Patterns → IceCubo Posts. Choose the design.
3. Edit the Index template.
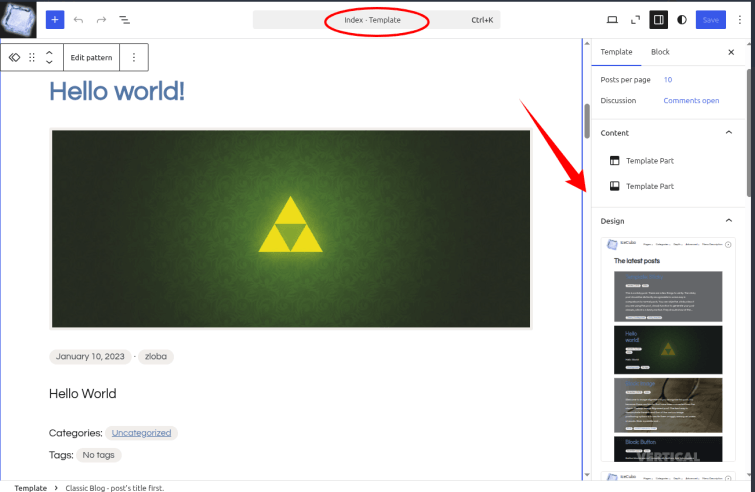
This is the option if the Reading settings is set with a “Posts Page”. From the admin dashboard, go to the Appearance → Editor, then access the Templates and find the “Index” template to edit. You can change the design from the right sidebar settings (Template → Design).
Setting the Blog as the Front Page
If you want to set the blog posts as the front page, access the Front Page template and replace the entire content with the Blog post template. To do this, you can either start with a query block (Block/patterns inserter → Blocks → Query block) or utilize predefined designs from the Patterns sections (Block/patterns inserter → Patterns → IceCubo Posts)
Logo
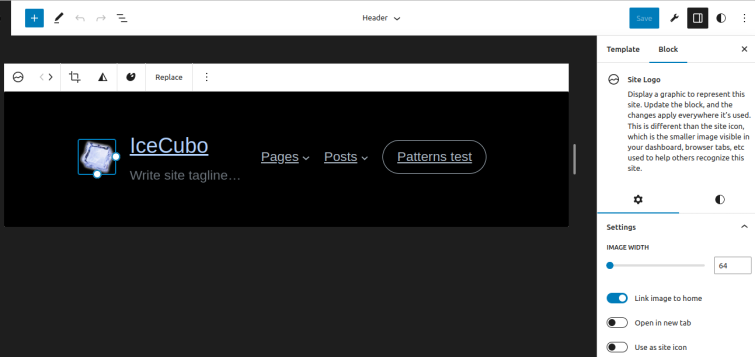
You can set the Logo from the Site Editor → Patterns → Template Parts. Select the Header template part, and there you can edit the logo settings. Either edit the text or upload an image. This will reflect on all the templates that have the Header template part incorporated. You should do the same with the Front page template and on any other template that contains the logo.
Site Editor
Just like editing the Front page, you can explore other options of the Site Editor. Once the theme is active, you can access the Editor section, which represents the design sphere of the site. Access it from:
- Admin → Appearance → Editor
- Or Front page → Edit site
Note: Site Editor is a WordPress native feature with myriad features and design options. We do not go into detail regarding all the Editor’s options, documentation here is only for the features that the theme relies on. For other aspects of the Site Editor, you should look in WordPress’ official documentation or maybe on YouTube.
From the screen’s left side, you can manage:
- Navigation
- Styles
- Pages
- Templates
- Patterns (including Template parts like Header & Footer)
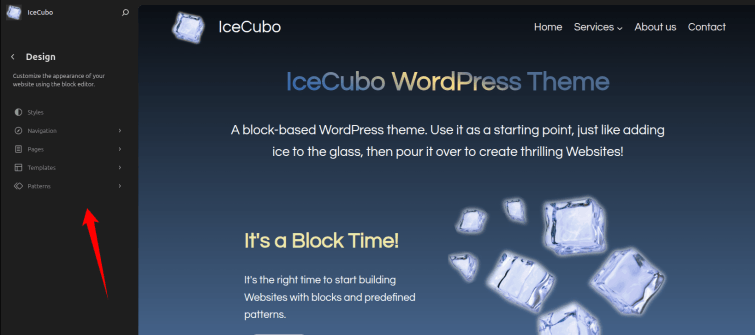
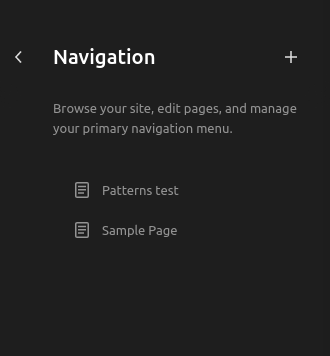
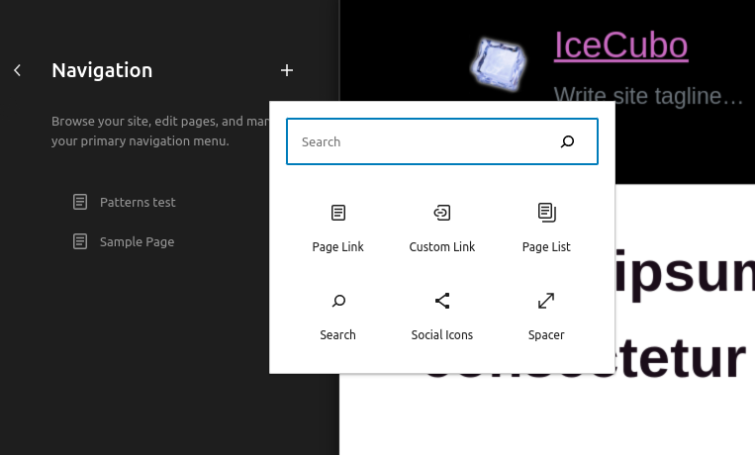
Navigation
Here you can add and remove menu items.
Styles
From the Styles, we’re interested in the “Browse Styles” option, as that’s where you’ll find what the theme provides. With other options, you would be dealing with the overall site’s styling, other than what the theme supplies.
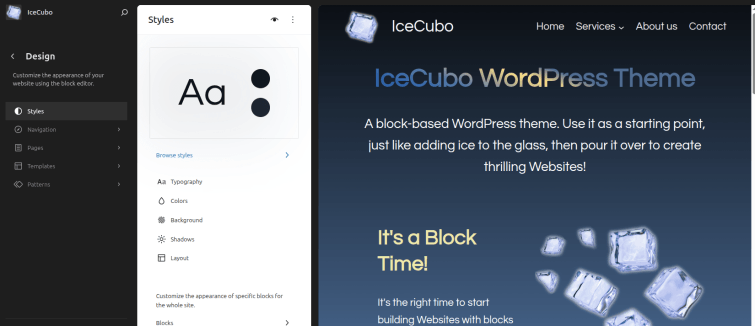
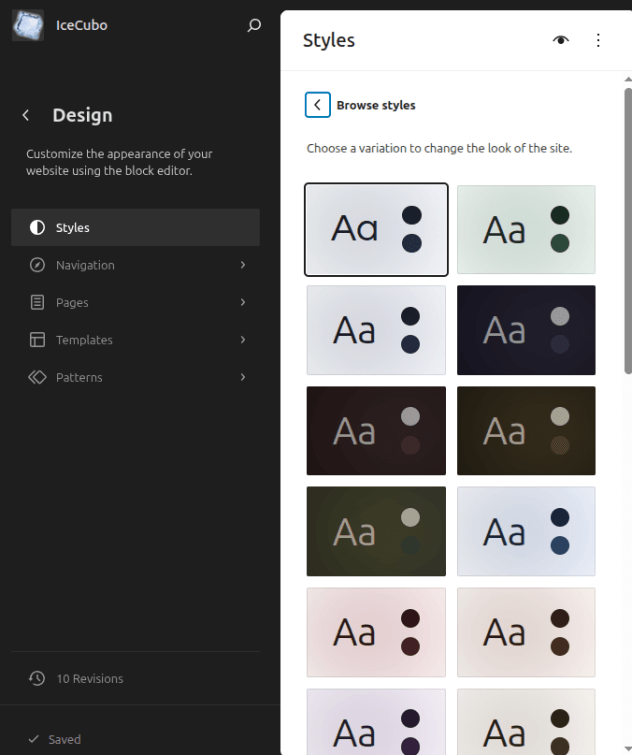
The styles section allows you to switch among the available skin styles that a theme provides. With the IceCubo theme, there are several predefined skin schemes to pick from.
You can separately change the colors scheme, or typography section allows you to change the font styles.
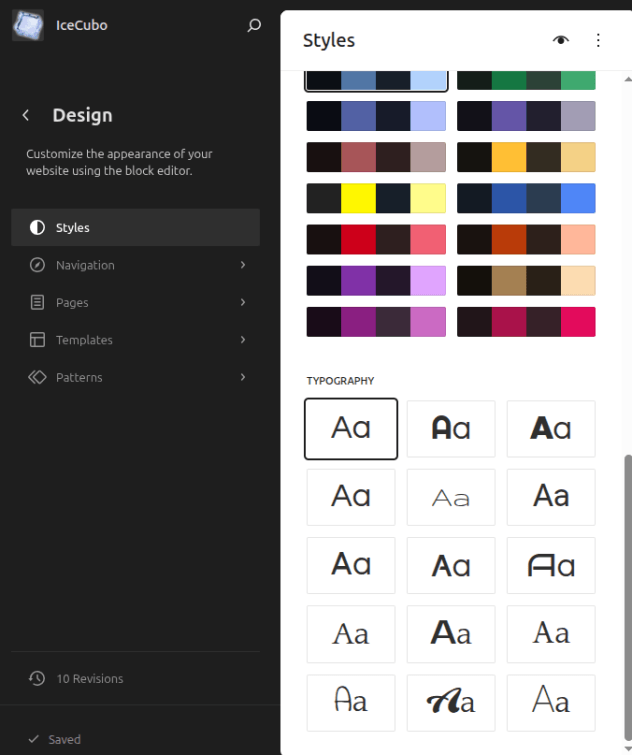
Alternatively, the style variations are also accessible from the right sidebar once you’re in the template editing mode:
From the Styles sidebar on the Editor’s right side, you can access the available styles, too.
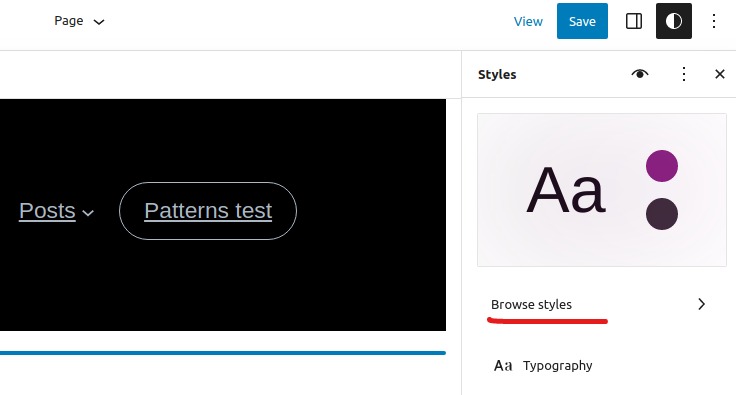
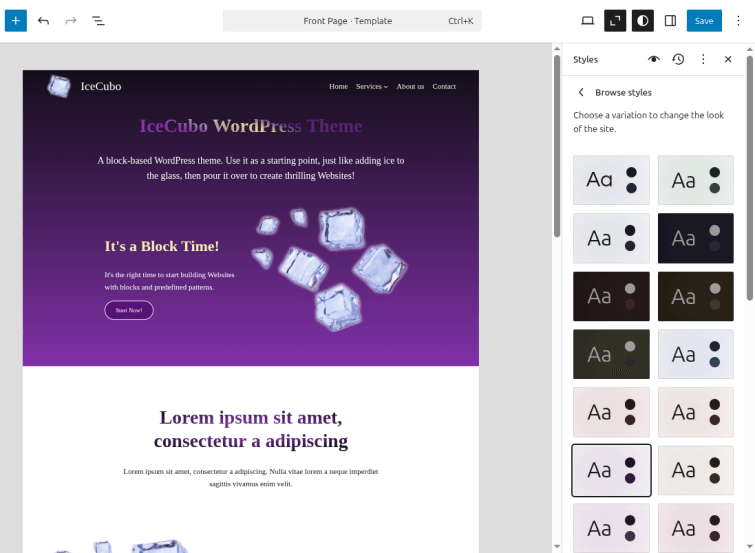
As you can see, the styles section gives you the ability to pick a predefined theme style.
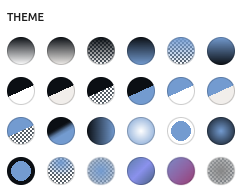
Each skin has its combination of typography and color schema that gets automatically applied to basic elements, e.g. links, pattern backgrounds, etc.
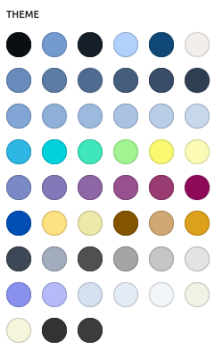
Still, you can also customize any block and apply predefined colors. IceCuob’s skin color schema is also available from the most block settings with its colors and background gradients. You can access this option from any block that provides the color or background options:
Full-Page Designs (Basic and PRO)
While with the IceCubo theme, there are just a few full-page design patterns, the PRO version gives you access to many specific designs.
This can be accessed from the Site Editor → Settings (i.e. in the Right Sidebar) → Template (Tab) → Design.
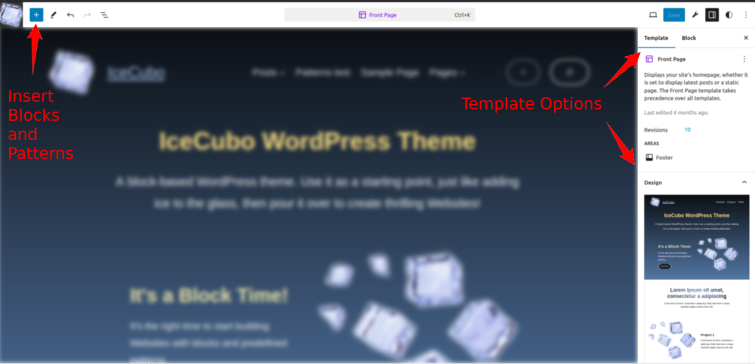
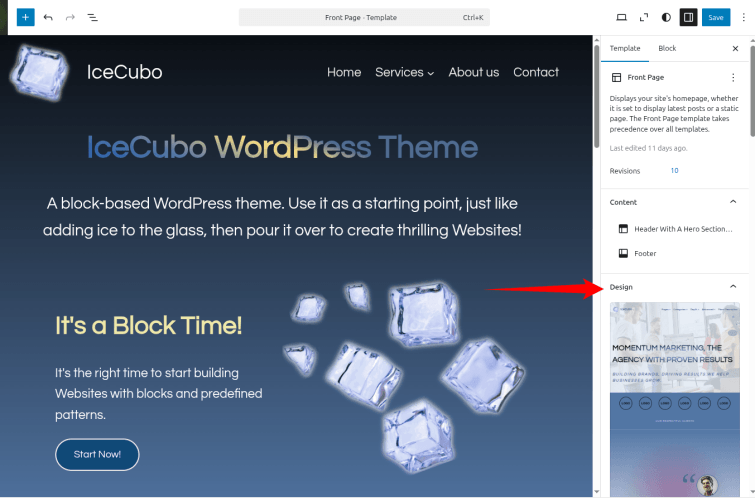
However, to have access to the IceCubo PRO Design Templates, previously you have to enable each one you wanted to have access to. As already described, this can be done from the WordPress Dashboard → Appearance → IceCubo theme → Settings. You can enable particular design template, or all of them, as you wish.
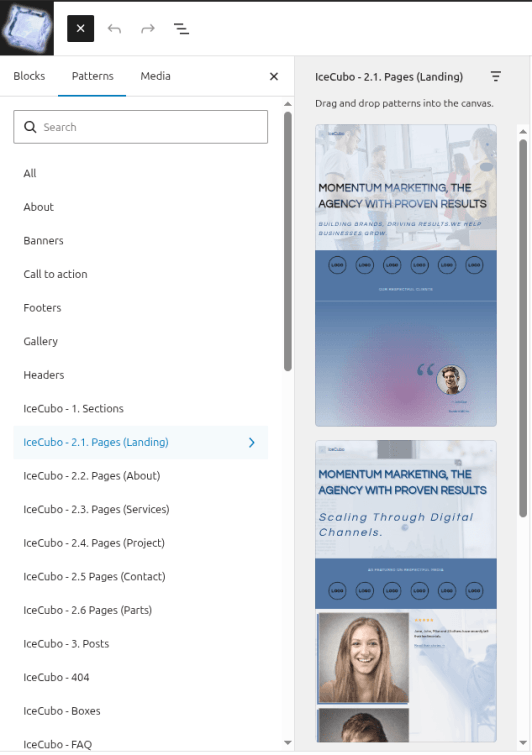
Another way to access the full-page patterns is from the blocks inserter. This is convenient to do from the page editing interface.
Note: Full-page Patterns from the “Pages Landing” section come with the header and footer, so it’s convenient to use “blank” template in that case. If you’re using another template that contains its own header or footer, then remove the one from the inserted template. About and Service full page patterns do not come with header and footer, so you should use the template that contains the header and footer, i.e. the best option is to use the notitle-alike-page.
Templates
Inside the Editor, the templates section enables you to add new or edit existing page layouts.
From the Editor, clicking on the bottom link “Templates” leads you to the following screen:
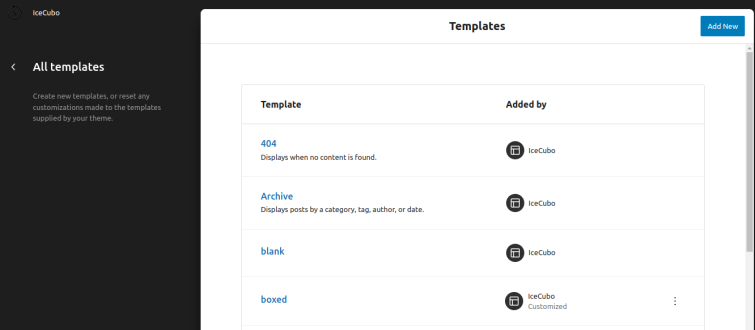
If you wish to go over the editing, rather than edit an existing template, you can add a new template by using the “Add new” button in the top-right corner of the screen.
With IceCubo, templates that start with a capital letter are assigned to some post type or archive type in the following way:
- Page: 404 → Page not found
- All archives → “archive” pages
- Index → Default blog layout
- Pages → Default for the single page of the “page” post type
- Single posts → Default for the single post of the “post” post type, i.e. blog posts
- Single without post header → Available for the “post” post type
- Single Post – Narrow → Narrowed post layout, available for the “post” post type
With IceCubo, templates that do not start with a capital letter are post-type agnostic. You can select these templates while editing any single post/page across your site. The IceCubo theme comes with the following site-wide templates:
- blank → Empty template, which means no Header and Footer
- boxed → Content is featured in an emphasised box
- alike-page → The same as a Page’s default template, but you can apply it to other post types
- alike-page-narrow → For a narrowed page layout
- notitle-alike-page → Like a Page template, just without a Title
- notitle-noheader-alike-page → Like the Page template, but without the page’s header and the title
- sidebar-left → With a sidebar on the left *
- sidebar-right → With a sidebar on the right *
* For the templates with sidebars, you should actually edit their sidebar content if these templates are intended for use over the site.
Once you make a change to a template, it’s going to be reflected on all pages where that template is used.
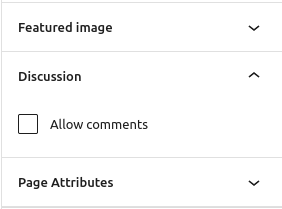
Note: The comments section is included in most of the templates, like Pages, alike-page, boxed, etc. This means, comments option is not just for those pages related to the blog (Single Posts). Still, in order to utilize the comments on pages or other post types, you need to enable this from the settings of each page.
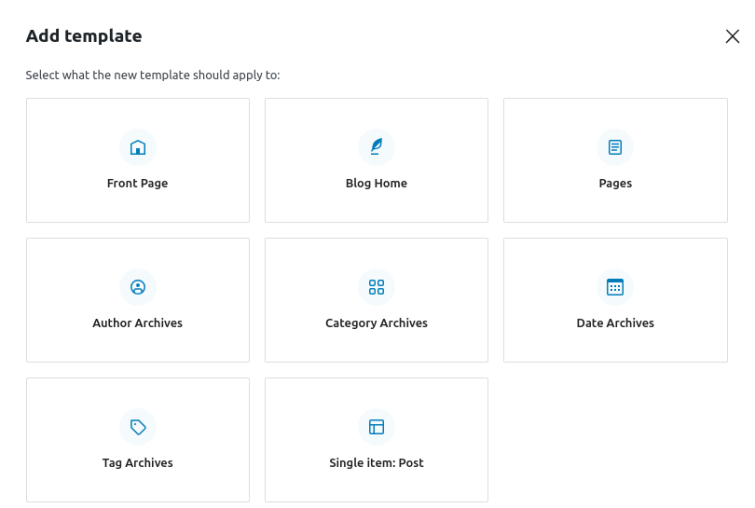
Add a pre-defined template
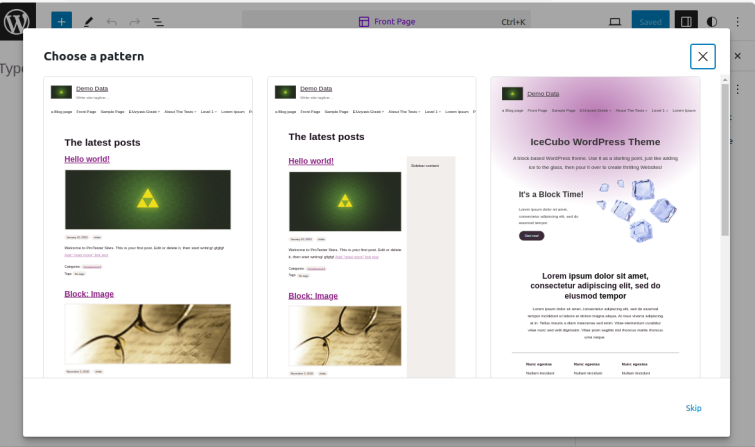
When you’re adding a new template (e.g. Front Page or Blog Home), a popup modal may offer starting templates.
Editing a template
Accessing any template, you’ll be able to add blocks and adjust them to your needs. Also, notice the right sidebar. From there, manage the template itself, while the next tab provides the settings for each block.
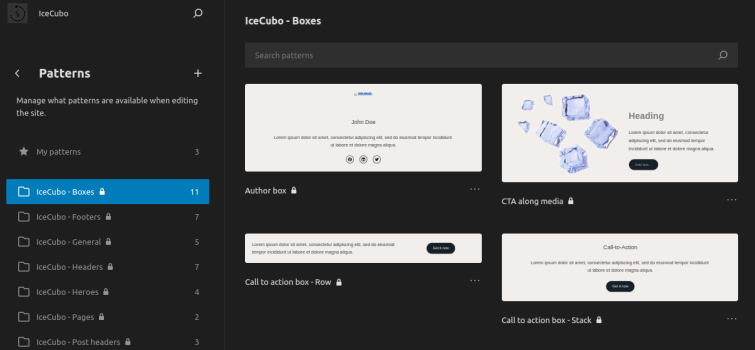
Patterns
The IceCubo theme comes with design patterns that you can access from the Patterns section inside the Site Editor.
Patterns → Template parts
Template parts are the essential parts of the themes, and these sections of the site appear on different pages and most likely constantly over the whole website.
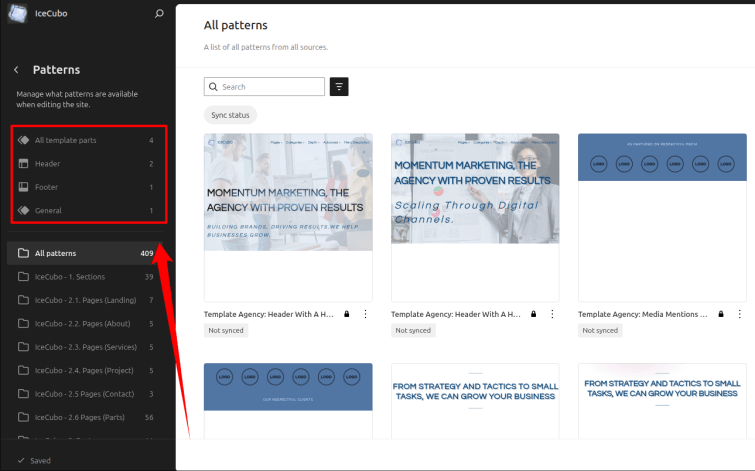
Template parts are accessible from the “Patterns” section. You can select the template part you wish to edit.
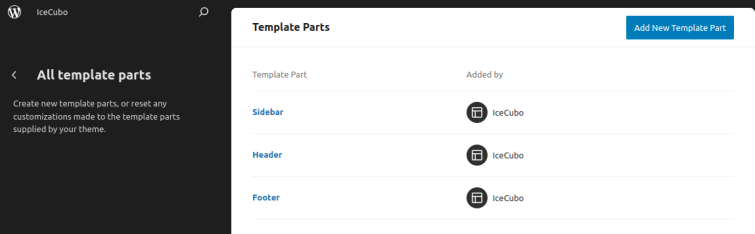
The IceCubo theme comes with the following template parts:
- Header
- Footer
- Sidebar
- Navigation Overlays
You can access the following screen, and there-from you can add a new Template Part or reset the edited ones.
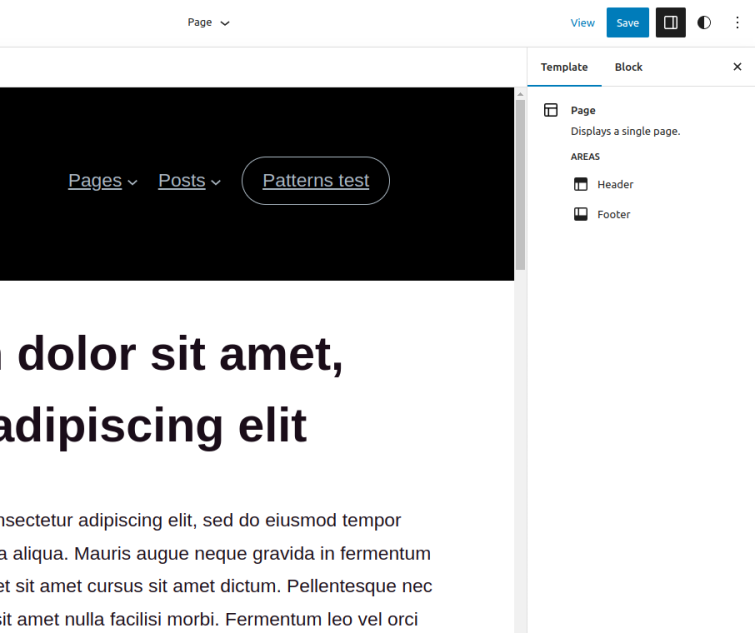
Once these areas are edited, changes will reflect over the whole site where the template part is implemented.



For example, changed colors in a header reflect on all pages where the template part is used. You see here, the changed background color will reflect on the current page. Further, all pages where this header is used will reflect the change.
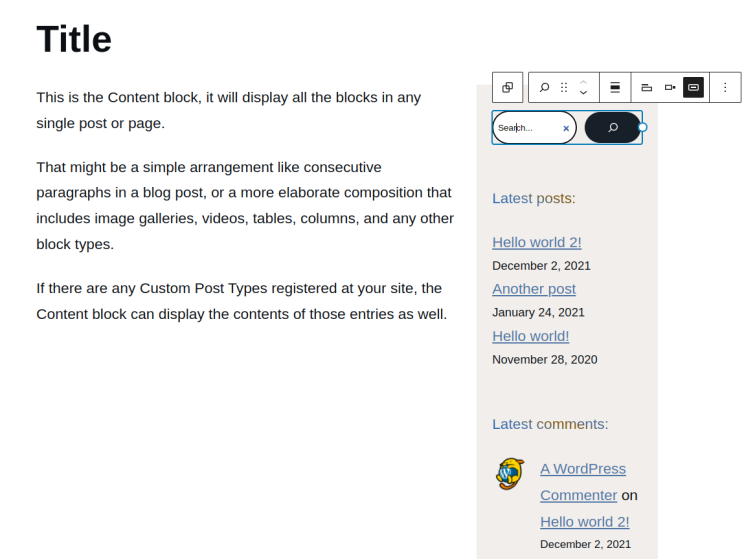
While “Header” and “Footer” are applied to almost all templates, only two templates contain the sidebar placeholder (sidebar-left and sidebar-right). While editing these templates, you’ll notice the placeholder “sidebar content”. From there, you can include the existing “Sidebar” template part (or another one if you’ve created it):
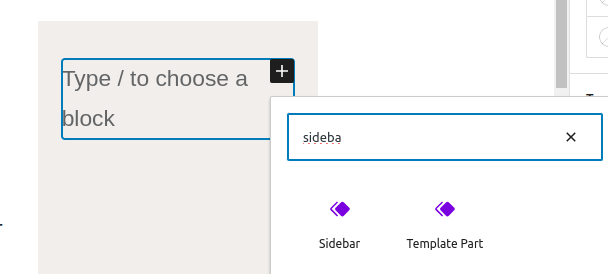
- To include the existing “Sidebar”, inside the template from its placeholder, just approach it like you’re adding a new block (+ Inserter) and type “Sidebar”. You’ll be able to select the Sidebar template part. Once more, this is done in the editing mode of the Template (sidebar-left or sidebar-right)
- The default IceCubo’s Sidebar contains common blogging blocks (Search box, Latest posts, Latest comments, Archive). You can delete some of them or add more blocks. Alternatively, if you’ve created another custom template part, you can set it in this placeholder
Block settings
Here we’re talking about editing the blocks inside the Site’s Editor, which technically doesn’t differentiate much from editing blocks inside the page editor.
Example with a Logo
While editing a template or template part, in order to change any aspect, you have to actually change the block settings. The obvious example, and something you most likely have to do, is to add the logo.
You’ll find the logo block in the “Header” template part. Simply, access “Patterns” → “Template parts” → “Header” template part, and click on the logo block, and you’ll be able to change its settings.
Once you select the desirable block, its settings are accessible from the editor’s right sidebar.
Page editing
While editing each page or post, you’ll see that some options rely on the theme settings.
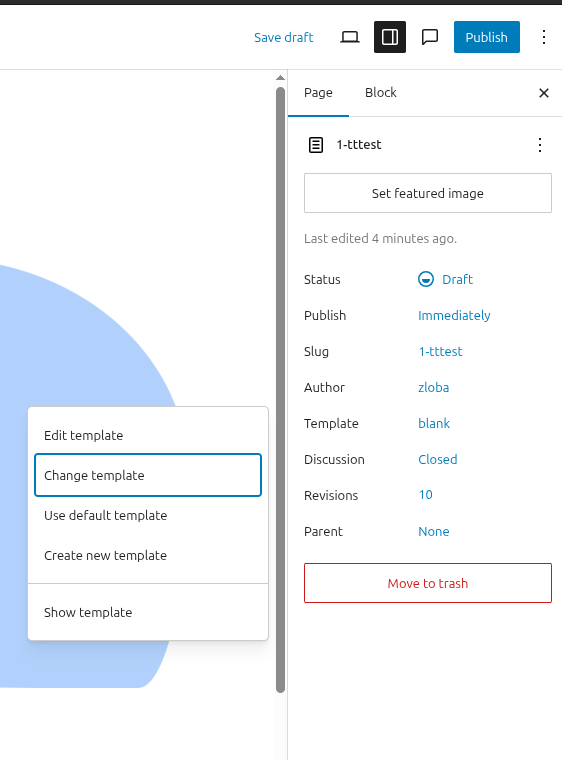
Changing template
While editing a page, you can change the layout of each page by selecting the desired template.
Locate the Template section from the Post or Page settings in the editor’s right sidebar. Choose the one that’s adequate for your current content.
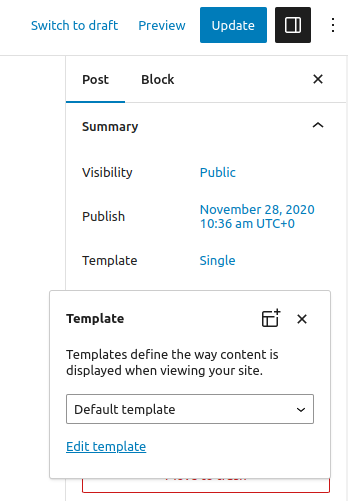
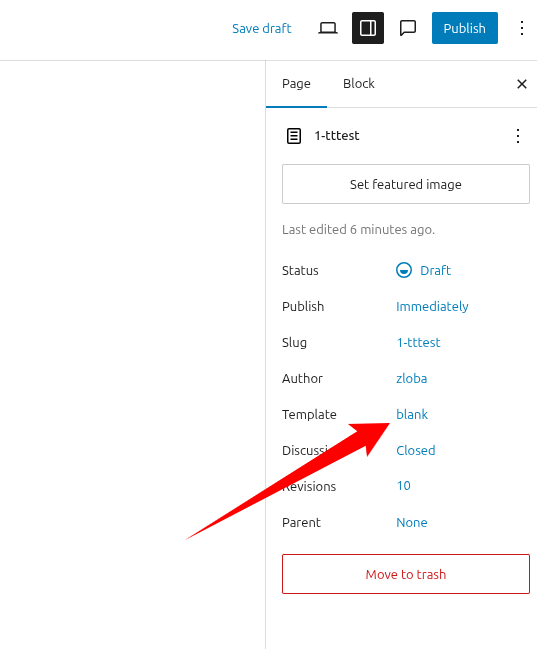
You see, here we changed the template to “blank”
Overall styling
The following features are present in all site editing aspects, no matter whether it is a post/page editing or overall site/template editing.
Patterns
While the patterns are also reachable from the Site’s Editor, they are also utilized from the Page/Post editing.
Access the patterns from the “+ Inserter” → Patterns.
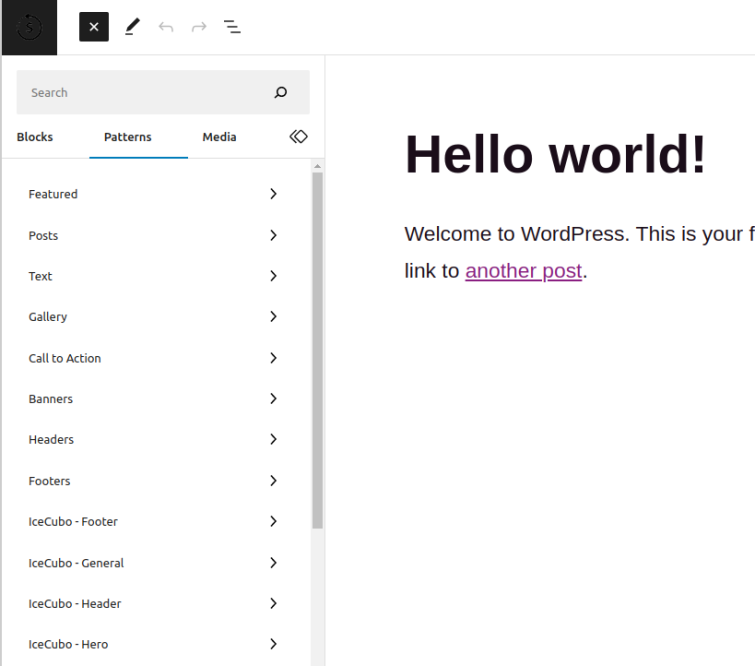
IceCubo available pattern sections:
- Sections
- Pages (Landing)
- Pages (About)
- Pages (Services)
- Pages (Project)
- Pages (Contact)
- Posts
- 404 page
- Boxes
- FAQ
- Features
- Footers
- Header-Heros
- Headers
- Heroes
- Navigation Overlay
- Numbers
- Portfolio
- Post headers
- Posts: Division (based on columns)
- Posts: Division (based on one topic i.e. from one taxonomy)
- Posts: Magazine intro
- Pricing
- Team
- Testimonials
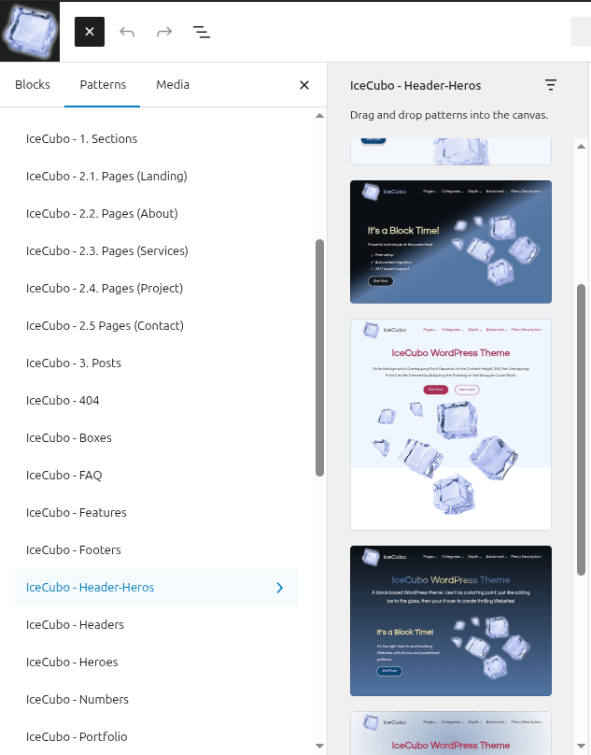
Patterns (PRO)
There are 200+ patterns with the Free version, while the IceCubo Pro brings an additional 50+ premium general patterns. Further, with each premium design template activated (Starter Site), there are 15–20 additional page sections plus full-page premium patterns. This means that in the moment of the Pro version launch, there are 450+ patterns available.
IceCubo Pro gives you access to more patterns, but also provides some additional full-page patterns through the following classification:
- Pages (Landing)
- Pages (About)
- Pages (Services)
Note 1: With the provided IceCubo patterns, for the Front Pages (Landing) use the “blank” template, because they come with its own Header and Footer. Of course, you can replace or delete these headers or footers, and use another template in that case.
Note 2: With the provided IceCubo patterns, use the “notitle-alike-page” template for the About & Services patterns, because these templates come without its own header and footer.
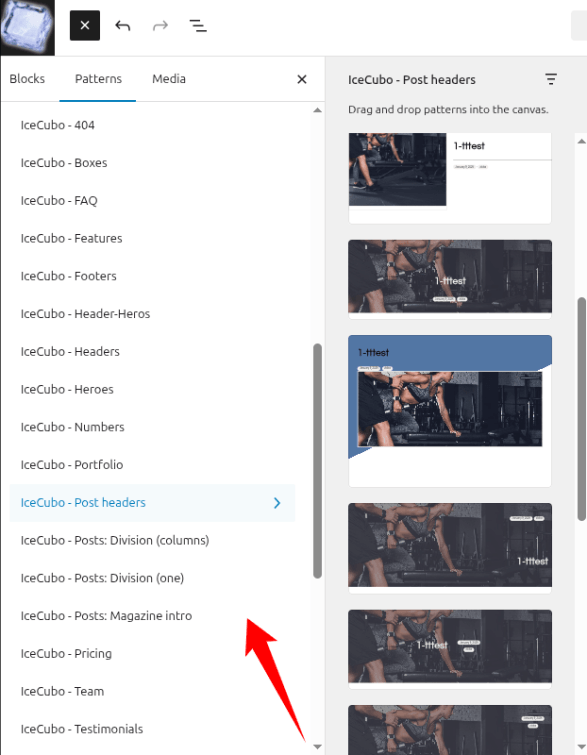
With the Pro version, there are more patterns available. Just explore sections like:
- IceCubo – Sections (Premium) – requires design template activation
- IceCubo – Header-Heros
- IceCubo – Post headers
- IceCubo – Posts: Division (columns)
- IceCubo – Posts: Division (one)
- IceCubo – Posts: Magazine intro
Block styles
The IceCubo theme adds some predefined block styles. These styles are applied from the block settings. With one click, you can apply these styles to the following blocks:
- Button
- Outline → Gives the framed style
- Accent up → Give a button push-up effect
- No border → Eliminate default borders
- Byline / Terms / Pagination / Comment reply link (most likely editable from the Site Editor)
- Square
- Oval
- Outline
- Each item Square
- Each item Oval
- Each item Outline
- Details
- Default – With a details block, you can reveal additional content
- Square – Adds the outline to the static content part
- Oval – Adds the oval outline for the static content part
- Heading
- Accent small → Applies the tiny text-shadow
- Accent huge → Applies the large text-shadow
- Accent wide → Applies the echoing, glowing shadow
- Aside lines → lines besides
- Asterisk → Adds the asterisk above the heading
- Mix colors → A few styles are available that mix colors
- Star → Adds a star above the heading
- Underline/Overline → Lines under and above
- Image/Media & text
- Rounded
- Angular – emphasized corners
- Angular D – just diagonal corners emphasized
- Bulge
- Curly frame
- Sink left (frame sinking a bit on the left)
- Sink right (frame sinking a bit on the right)
- Solid frame
- Spaced frame
- Spaced and cut frame
- List
- Checks → Before the items, add a checkmark
- Plus → Before the items, add a plus sign
- Fill → Before the items fill the dot with a primary color
- Checks circled
- Plus circled
- Fill circled
- List item
- Cancel list → Converts the list sign to the negative value (x or -)
- Navigation Link
- Outline → Adds a tiny border around the navigation item
- Navigation link with sub-items
- Multi → Create multi-column submenu. The default is 2 columns, but you can change that to up to 5 columns by adding the following classes
mm3,mm4, ormm5. The class can be added from the block’s advanced tab
- Multi → Create multi-column submenu. The default is 2 columns, but you can change that to up to 5 columns by adding the following classes
- Paragraph
- Annotate box → Outline around the text
- Accent box → In a shadow style makes a paragraph eminent (you have to apply the background color to gain the padding)
- Tear box → gives the tear style to the box (you have to apply the background color to gain the padding)
- Mix colors → a few styles are available that mix colors
- Subtitle → enlarged font size with tighter line height
- Post Title
- Accent small → Applies the tiny text-shadow
- Accent huge → Applies the large text-shadow
- Accent wide → Applies the echoing, glowing shadow
- Aside lines → lines besides
- Asterisk → Adds the asterisk above the title
- Mix colors → a few styles are available that mix colors
- Star → Adds a star above the title
- Underline/Overline → Lines under and above
- Search
- Default – Search box with button
- Full screen (Pro) → in the background, trigger a full-screen overlay for the search box. Most useful when set as the button inside the navigation menu
- Full row (Pro) → trigger a full row for the search box (removes adjacent elements)
- Social Icons
- Default
- Logos only
- Pill shape
- Outline
Note: Some of these blocks, like Navigation or Post Title, are suitable for editing from the Site Editor, rather than from the post/page Editor.
Block Styles Examples
To get a style applied, from the block settings, find the “Styles” section and select the desired style.
With our paragraph block example, you can see the “Mix colors light” style selected:
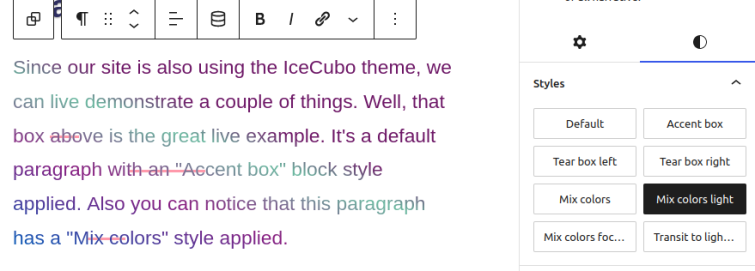
…And since our website is also using the IceCUbo theme, here’s how it looks live on the front side:
Since our site is also using the IceCubo theme, we can live demonstrate a couple of things. Well, that box above is a great live example. It’s a default paragraph with an “Accent box” block style applied. Also you can notice that the current paragraph that you’re reading now has a “Mix colors” style applied.
Besides the above paragraph, here’s another live example with buttons, each button has a different style applied:
We may add additional block styles with IceCubo updates, still, the intention is to keep the theme lightweight.
You can also see almost all examples of the IceCubo block styes at its demo.
Last block alignment
Since every block has its default spacing (padding and margin), last block may be appearing with unwanted spacing towards the page’s footer. This is happening on the templates where the footer exists.
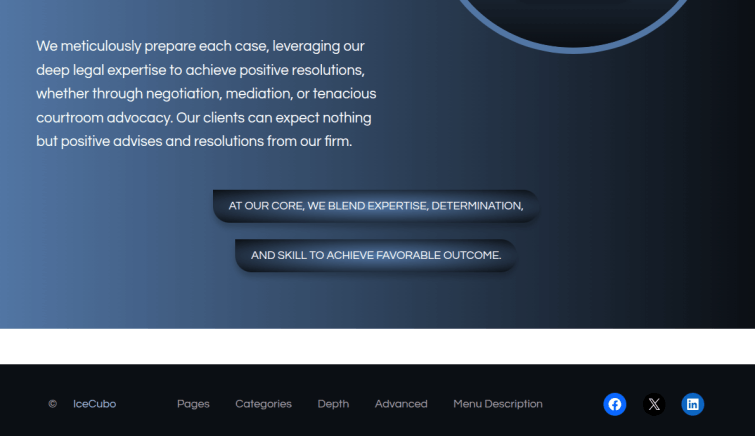
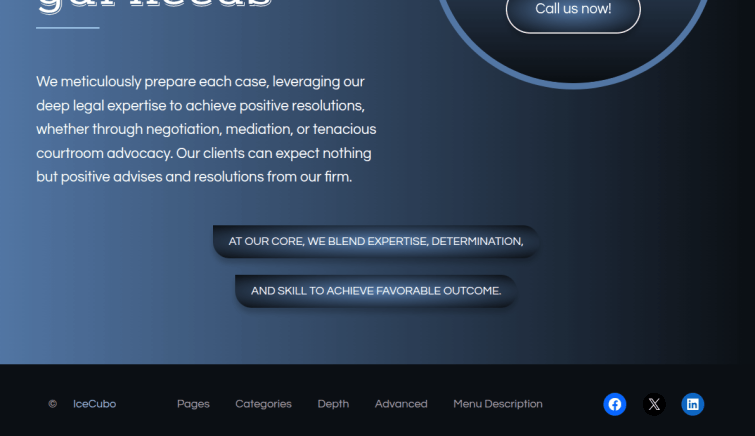
Resolve the unwanted spacing by setting the -3.5rem to the margin’s bottom
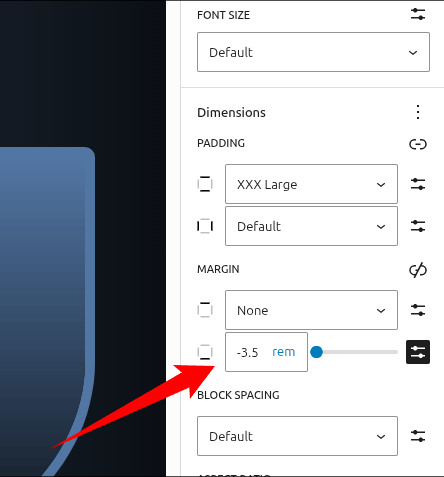
This can be resolved from the block settings, by applying the negative bottom margin of 3.5rem, to the block that’s adjacent to the footer
Navigation styling
Besides the navigation block styles, you can additionally style the navigation menu and mobile menu’s overlay separately.
Mobile menu’s overlay
For your navigation you can set a mobile menu overlay. You can see the list of available template styles from the Editor → Patterns → Navigation Overlay.
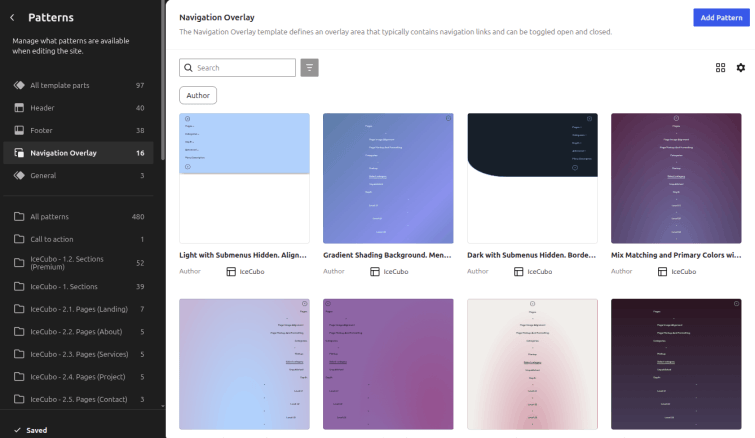
Note: IceCubo Pro version provides specific animations applied on most of the overlays.
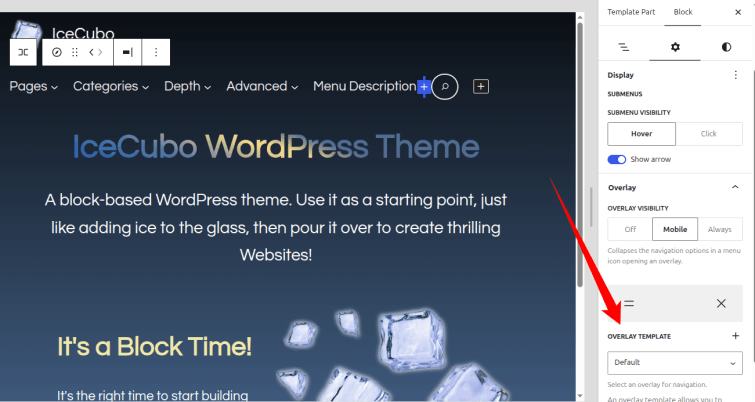
To change the overlay for the menu, from the navigation block settings find the option Overlay Template
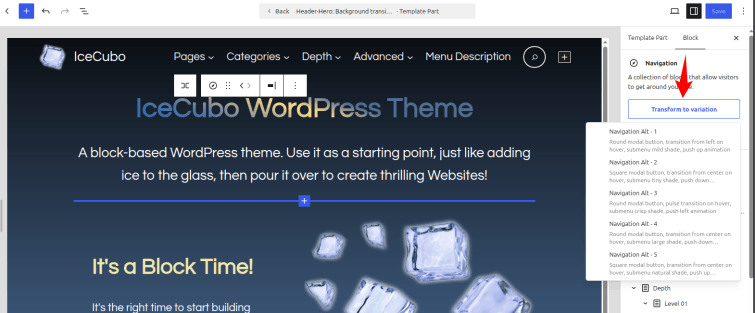
Navigation styling variations (Pro)
The Pro version gives you more options. One of them is the availability of variations for the navigation block. With one click change the preset of the available styles (options that change are: overlay opener button style, smooth transition during the mouse hover, submenu style and its appearance animation). Pick the variation from the navigation block settings.
Style by Class
These styles are based on adding a class to the desired block. The Class is added from the block settings’ Advanced tab (you’ll see an image example beneath).
Remove underlined links
Underlined links are considered accessibility requirements, as color differentiation from other text isn’t a reliable option, especially for those links within common paragraph content.
The IceCubo theme removes the underlined “text-decoration” from the links that are highlighted in some other way, i.e. heading links from the blog listing or post terms, etc. WordPress itself isn’t applying the underlined text decoration for its native blocks, like the navigation block links or button blocks, which are obviously emphasized as links in some other way.
We have added the option to remove the underlined “text-decoration” from the links that you do not want to keep emphasized this way. All you have to do is add a class remove-text-decor or remove-link-decor to the block where the link is present. This is done from the block options → Advanced tab →Additional CSS classes.
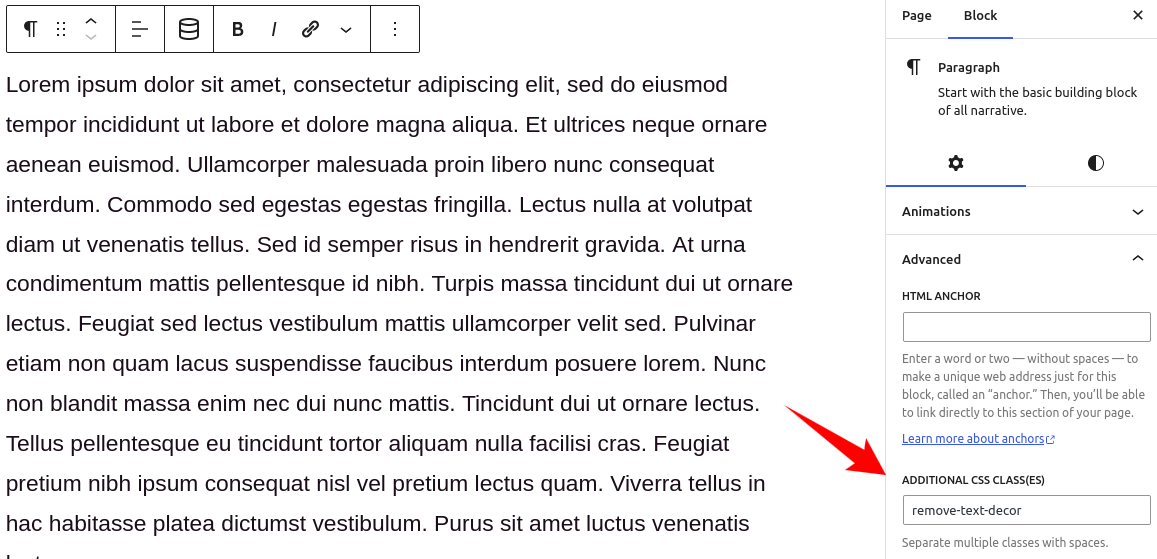
For example, footer links may be placed in paragraphs instead of the navigation block. Just add the aforementioned class to the block, and the underlined text decoration for links will be removed.
Alternatively, and accessibility friendly, specifically for the footer, you can use a navigation block, since navigation HTML markup is generally accessible. The IceCubo theme, by default, comes with footer links inside a paragraph block, but you can easily replace it, there’s even an IceCubo footer pattern with a navigation block as a starting point.
Mark a specific word or phrase inside a paragraph with mixed-color styling
Similar to the aforementioned paragraph styling, but the difference is that here we’re targeting a specific word or phrase.
We’re transforming a WordPress-built-in “highlight” feature with this option. Here’s how it works…
Select a word/phrase, and from the block’s toolbar, pick the arrow-down and choose the “Highlight” option.
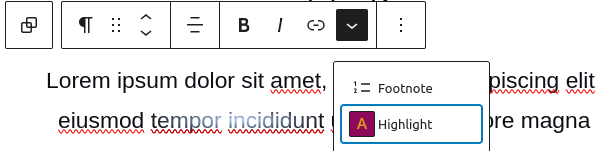
Now we’ll add the required class (see the image above for adding the class to the block). Instead of the picked color, by applying the following classes, one of the styles will be set:
- ice-mark-mix
- ice-mark-mix-light
- ice-mark-to-light
- ice-mark-focus
- ice-mark-pick (this one will use the color you pick from the highlight palette, while other styles use the theme-predefined colors)
Noice CSS tag
“noice” is the CSS selector you can use to discard IceCubo staying on some blocks. You simply add the noice to the Additional CSS classes for that block and IceCubo style will be removed (Select a block, from its settings sidebar → Advanced → Additional CSS Classes). This is helpful if you want to style the block on your own way.
Here’s the list of blocks with this option:
- Details – By default it have a border on the left side for the revealed paragraph
- Navigation – Current item (page you’re viewing) has the border beneath
- Post excerpt link – This is usually a short link like a “Read more →”. By default it spreads on the mouse cursor hovering
Here’s the screenshot of the Details block with and without noice tag:
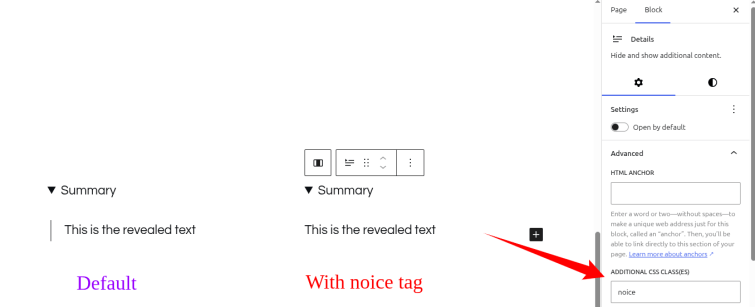
noice tag removes itYou see, “noice” CSS tag removes the left border from the revealed text.
Mobile forcing
Sometimes on small screens, the blocks do not stack as we would want. By adding the following classes to the block, you can remove the default block style:
- mob-force-flexwrap – will stack the row block
- mob-minheight-no – removes the “min-hight” CSS property if it’s already set on the block, e.g. group block
- mob-force-flexdir-columns – force the columns to appear in a ‘column’ direction
- mob-force-flexdir-columns-rev – reverse the order of the columns, i.e. display in the ‘column-reverse’ order
Animations (Pro)
We have added some animations, not too many, we would say just the right amount to bypass the bloating of the theme. This way you can make your page sections and elements vivid without relying on havy and complex animation solutions.
Animation can be applied to any block by adding the CSS classes. CSS classes can be added from the block settings sidebar → Advanced → Additional CSS classes.
Here’s the list of animation classes you can utilize:
- anim-bounce
- anim-fadeIn
- anim-fadeInUp
- anim-blurOut
- anim-pushUp
- anim-pushDown
- anim-pushLeft
- anim-pushRight
- anim-yankUp
- anim-yankDown
- anim-yankLeft
- anim-yankRight
- anim-flipX
- anim-flipY
- anim-rotaterev-left
- anim-rotaterev-right
- anim-to-transform – This is advanced, transform CSS property has to be used. Animation will perform towards applied CSS value.
- anim-to-blob – CSS’ border radius has to be used previously. Animation will perform towards the applied borders’ radius. Border radius is available as the option for the most blocks from their settings
- anim-scale-in-center
- anim-scale-in-hor-center
- anim-scale-in-ver-center
- anim-scale-in-top
- anim-scale-in-tr
- anim-scale-in-right
- anim-scale-in-br
- anim-scale-in-bottom
- anim-scale-in-bl
- anim-scale-in-left
- anim-scale-in-tl
- anim-slide-bg – Sliding background
- animd-slide-ch – Sliding through the characters
- anim-text-accordion – Text animate as accordion
- anim-text-accordion-minus – Text animate as accordion in reverse direction
- anim-text-glow – Text will have glowing effect with primary color
- anim-text-glowOff – Text will have glowing effect with primary color, eventually disappears
- anim-text-glowMatch – Text will have glowing effect with matching colors
- anim-text-glowMatchOff – Text will have glowing effect with matching colors, eventually disappears
Additional timing classes (for speed):
- fastest
- fast
- slow
- slowest
Additional timing classes (for delaying in seconds):
- del025
- del05
- del075
- del1
- del2
- del3
For the viewport repeated animation use the animrep class.
Note 1: To apply the animation, first you have to add the ice trigger class i.e. ice-anim . So the example animation would look like this:
ice-anim anim-bounce slow del1 animrep
Note 2: With IceCubo theme there is the theme Settings page inside the site’s admin area. There you’ll find the animation generator, with its preview as well. You can copy generated classes and paste it in any WordPress block as Additional classes from the block settings. In the previous section it’s already explained how to add additional classes.
Go back to the IceCubo info page.